
The first step in hacking your PSP is to create a Magic Memory Stick; xMESxINCx provides a good video on how to do this, although it's interrupted by a phone call, and a link to the necessary software. Basically you download software and run it with your PSP in USB mode. Ensure you use a Memory Stick over 256 mb that is backed up, since it will be formatted. The next step is to make a Pandora Battery. PSP batteries have a circuit board with an EEPROM chip, which when disconnected becomes a recovery battery. If you have access to a modified PSP you can easily convert your battery into a Pandora Battery with the creator program or you can purchase a modified battery. A common belief is that once the Pandora Battery is made the battery can only be used as a recovery battery; however, this is false, so it is unnecessary to purchase a new battery for modification. If, for some reason, you do decide to purchase a new battery, know that Sony has recalled older batteries and replaced them with batteries that cannot be turned into Pandora Batteries (yet).
The first step is to open the battery's case; however, be very careful: first, more force than you think is necessary to cut the case with a knife (I tested how much was necessary on a piece of plastic from a yogurt container, which has roughly the same thickness; second, if the battery is punctured is will pour forth smoke and catch on fire. I found this out the hard way on my first attempt on an old Extended Life Battery. I was lulled into a false sense of complacency by YouTube videos that didn't show the case-opening process. The result was that I attempted to open the case at 3:00 a.m. after a string of nights with no sleep while watching TV, stupid I know. Anyway I punctured the battery inside the case and had a lovely spectacle of smoke and fireworks. No harm was done, but my den reeked for a few days. Armandolora94 seems to be the only video that shows how much effort is required to open the battery's case. Keep your cool and you won't hurt your finger like him or say screw it and use a sharp knife once the case was partially opened like me.
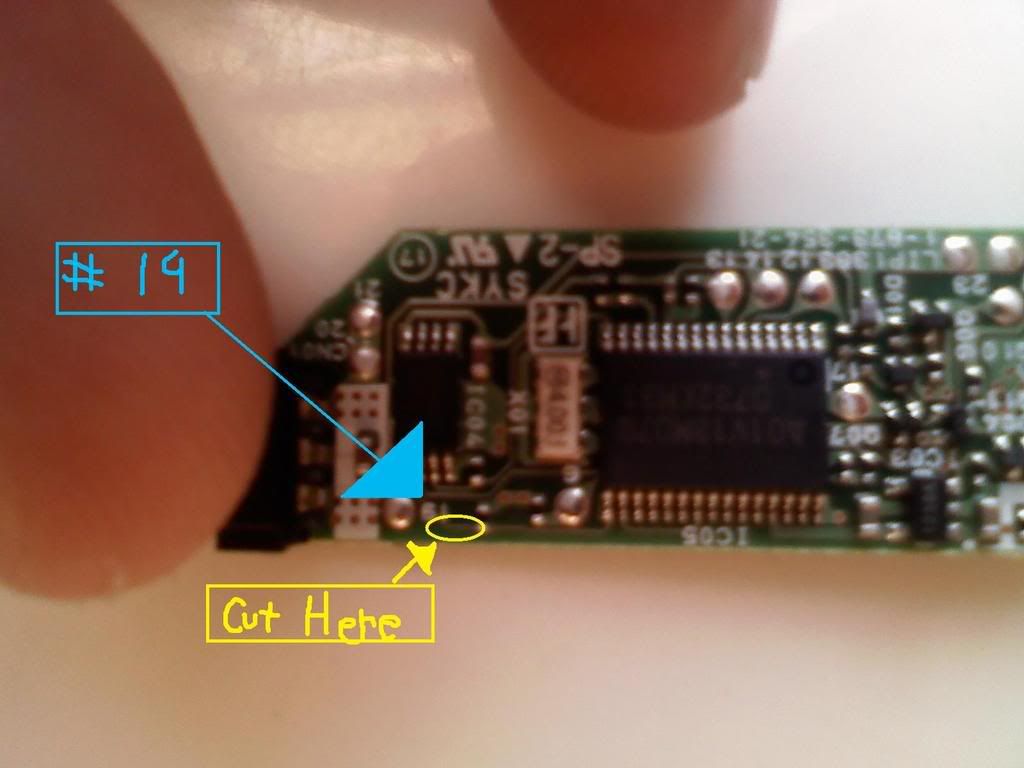
Once the case is open you open out the circuit board then cut the wire in the bottom left below the 1 or 9. xMESxINCx have the best video showing every step and a picture of where to cut. Once you have your Magic Memory Stick and Pandora Battery you return to the instructions on the first xMESxINCx (Magic Memory Stick) video. Once this process is done you repair the Pandora battery by filling in the cut you made with graphite from a pencil and you're done. You now have the 3.72 m33 custom firm ware (CFM) installed and can play ISO or CSO games, games taken off a UMD. To do so, press Select and you will see a "M33 VSH Menu"; toggle down to device and select "UMD Disc" by pressing the right or left arrows on the DPad. Then exit and go into USB Mode. Then go into Windows Explorer (My Computer) and select your PSP drive letter; you will then see an .iso file. Copy this file to your computer and you have an ISO game. When you're done making .isos switch the UMD Disc back to "Memory Stick".
Since many new games have large files it is best to compress them. Do this by downloading a CSO Compressor; I really like YACC (Yet Another Cso Compressor). Besides the cool name, it is really easy to use (select file locations and press "Go"). Once you have a .cso file, copy it to the ISO folder on the root of your Memory Stick (I kept the Magic Memory Stick as it was in case my PSP ever bricks and used another for my games, etc ...); if the folder is not there just create it. Then open the VSH Menu (Select) and choose "M33 driver" under "UMD ISO Mode" and you're ready to play (go to Game on the XMB and choose "Memory Stick" and select your game).
To play music while playing a game, looking at pictures, or surfing the Net, you need to install the Music PRX plug-in. The instructions for install are easy, follow the readme: if there isn't a seplugins folder on your Memory Stick just copy the one you've downloaded; if there is one edit the game and vsh folders in your seplugins folder. Then use the commands (Note plus Start to stop/start, etc ...) to control your music. If it doesn't work you may need to enable the plug-ins: go to the Recovery Menu (Turn your PSP off and hold the button for 7 seconds or so until the on light turns off; then hold the R-Trigger and turn your PSP on). Once in the Recovery Menu go to plug-ins and enable the music.prx plug-ins. In the Recovery Menu you can also set your PSP to charge whenever a USB cable is plugged in (Configuration > Charge battery ...). Exit the Recovery Menu and your PSP will boot up.
In order to update your PSP you will need to go to Dark Alex. Once there select the latest custom firmware and install it according to the directions. Once a version higher than 3.90 m33-2 is installed you can update the CFM via the update utility on the PSP. Enjoy the new capabilities of your PSP.


3 comments:
Awesome guide, thanks for sharing.
You're welcome.
Post a Comment